Ten lighting set-ups for fashion shoots
Ten lighting setups which you can easily create with a standard set consisting of three Hensel lighting units
by Dmitry Mukhin / originally published on fototips.ru
“Many aspiring photographers ask the question how one can set up lighting equipment when shooting a portrait in studio. Knowing that it’s very hard to learn without having any examples, we decided to write an article about fashion photography.”
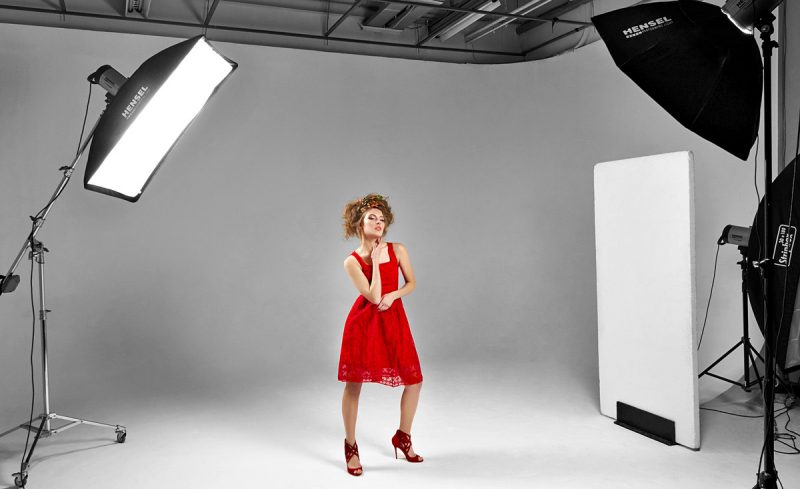
LIGHTING EQUIPMENT USED
“To make the setups easy to repeat in most studios, we used three Hensel Integra 500 monolights.
As well as the most popular light modifiers: 90 cm Octabox, 120 cm silver umbrella, Beauty Dish, standard reflectors, Stripboxes in 60 х 120 cm and 30 х 180 cm (ideally these should be the same, but we had to work with what was available). Beside these we used reflective panels and black flags.”
Setup 1


“As the main light we used the lighting unit with a silver umbrella, set a bit to the left from the camera. We set two lighting units equipped with stripboxes on each side and a bit behind the model.
To avoid the influence of stray lights on the background we put white panels between the background and the lighting units. The panels keep unwanted light from the background and redirect it onto the model. This also adds more volume to the back light. The background itself was illuminated by the main light only.
The background lighting intensity in this setup can easily be controlled by the position of the main light. If you raise the light with the umbrella higher and tilt it down to the model more sharply, the main light falls onto the model, and the background is only hit by the light coming from the upper peripheral part of the umbrella, so the background, in this case, becomes darker.
If we put our main light to a lower position and turn it to a more frontal direction, then a rather huge amount of light coming from the main lighting unit will fall on the background making it lighter, but an unwanted shadow coming from the model may appear at the background.”
A draft of the setup (click to enlarge):

Setup 2


“Bright, saturated colors of the model’s clothes are looking perfect in front of an absolutely white background.
When lighting a background to the maximum, there is always the danger that the light reflected from the background will be so powerful that it will fill the whole scene. To avoid these stray lights, you have to determine the right light exposure. To reduce the amount of stray light from the background to a minimum, we used standard reflectors we used standard reflectors. Additionally, we installed white panels between the monolights and the model.
As a result, the side light from the background lighting units goes directly to the background, without touching the model. Both the direct light and the reflection from the backside of the panels turned the background completely white without any shadow coming from the model. The front of the white panels functioned as fill lights, reflecting the light coming from the main lighting unit.
The final picture features good contrast and every detail of the clothes is clearly visible.”
A draft of the setup (click to enlarge):

Setup 3


“This is a very simple setup. As our main light we used the monolight with an octabox.
We made full-length shots of the model, so we used a 30 х 180 cm stripbox which was set on the left side of the model. This kind of stripbox is ideal for full length shots.
In the end, we got a brightly illuminated model standing out clearly against the dark grey background.”
A draft of the setup (click to enlarge):

Setup 4


“Now it’s time for a setup with a single light source. The main light comes from the monolight equipped with our favorite tool – the octabox! At both sides of the model, we used two large reflecting panels to fill the sides up with light.
It turned out to be just enough to get an interesting picture. As you can see here, the background is illuminated evenly.
Why have I called the octabox a favorite tool? That’s because I have always liked it for its rather soft (nearly umbrella-like) but easily controllable light. And we don’t get a square shaped eyecatch that we get from a normal rectangular or square softbox, but a round, natural looking reflection.”
Draft of the setup (click to enlarge):


Setup 5


“In this setup, the main light is coming from an octabox. We used a stripbox as backlight and separated it from the background with a reflector panel to efficently decrease stray light on the background.
To create the gradient on the background, we used a monolight equipped with a 12″ reflector and grid. The light spot on the grey background makes the picture more vivid.
If you want to be more creative and use color gels set on the background lighting unit, it will add a new effect to the image and turn the tender grey background to a colored one. The size of the spot can easily be adjusted with help of grids featuring different degree values.”
Draft of the setup (click to enlarge):

Setup 6


“For one of the previous images (setup 4) we created an even dark grey background.
By adding a background light with a standard reflector and grid to the setup, we illuminated the background and changed the mood of the image in an instant. This example shows best of all the way how any setup can be changed and supplemented to reach the defined goal.”
Draft of the setup (clickt to enlarge):


Setup 7


“The full-length shot with a pretty tall model required an even illumination from the top to the bottom of the frame. It’s easy to get it if you use the monolight with a long stripbox as the main light.
For the back light we also used a stripbox. To both sides of the model we installed black light absorbing panels, so that the light from the monolights won’t be reflected uncontrollably back on the model.”
Draft of the setup (click to enlarge):

Setup 8


“The next one: For the main light here, we used the lighting unit with an octabox.
The back light source with a stripbox was placed behind the model at the left and high enough to illuminate the hair, too.
To create a fill light in this picture, we added a reflector panel to the right of the model.
The setup like this allowed us to get a good and even background illumination and to outline the model with a back light at the same time.”
Draft of the setup (click to enlarge):

Setup 9


“An umbrella is rather rarely used in the studio, while on location it is very popular due to its compact size and prompt readiness to work.
For the main light we used the light source with a silver umbrella and an umbrella flood reflector which provide together a quite soft but still brilliant wrap-around light.
The light is spreading from the source in a continuous lightwave, illuminating practically everything on its way. In our case we used a big parabolic umbrella that gave us a light beam which we still could control by moving the umbrella axis. Closer to the reflector results in harder light, moving it further away from the reflector results in softer light.
The umbrella was located almost above the photographer’s head, a bit to the right and directed sharply downwards.”
Draft of the setup (click to enlarge):

Setup 10


“For our main light here, we used a Beauty Dish. To get a more directed light beam in the middle, we also attached a metal grid.
At both sides of the model we placed light absorbing panels (so called French Flags). The model wearing a black leather jacket, was illuminated with a narrow beam of light so that the background appears to be completely black.
In the second picture, we illuminated the background with a 9″ reflector as a light modifier to separate the jacket from the background,”
Draft of the setup (click to enlarge):

Conclusion
“Drawing a conclusion to this overview, I would like to say that good pictures can be taken with one or also with two light sources that can be combined according to your imagination. Using three light sources at your shoot makes your possibilities unlimited. This is the reason why many lighting companies, including Hensel, offer kits including three lighting units and light modifiers packed in a convenient branded case.”
Watch the behind the scenes video of this shoot here:
Credits
We thank hensel-studio.ru, exclusive distributor of Hensel in Russia, for technical support in the organizing of this shooting.
Team
Photographer and styling: Ira Bachinskaya, @irabachinskaya_photographer
Author and technical specialist: Dmitry Mukhin
Makeup: @VASILISA (Елена Васильева)
Models: Yulia Khan, Sima Rybakova, Yulia Kozhukhova, Violetta Orlova.
Supported by ![]()